CNC Machine Calibration Tool Height: Manual Setup with Masso
MASSO’s integrated tools library and calibration system makes it really easy to calibrate tool heights and manage up to 32 tools on your CNC machine. So here are the steps required to calibrate your tool heights with MASSO.
The first step is to home the machine. As we mentioned in our earlier video about homing, it is very important to first home the machine because without having a proper homing set up, you can’t calibrate your tool height.
Home the machine by pressing ctrl alt home. Once homing is done, we’re ready to start calibrating!
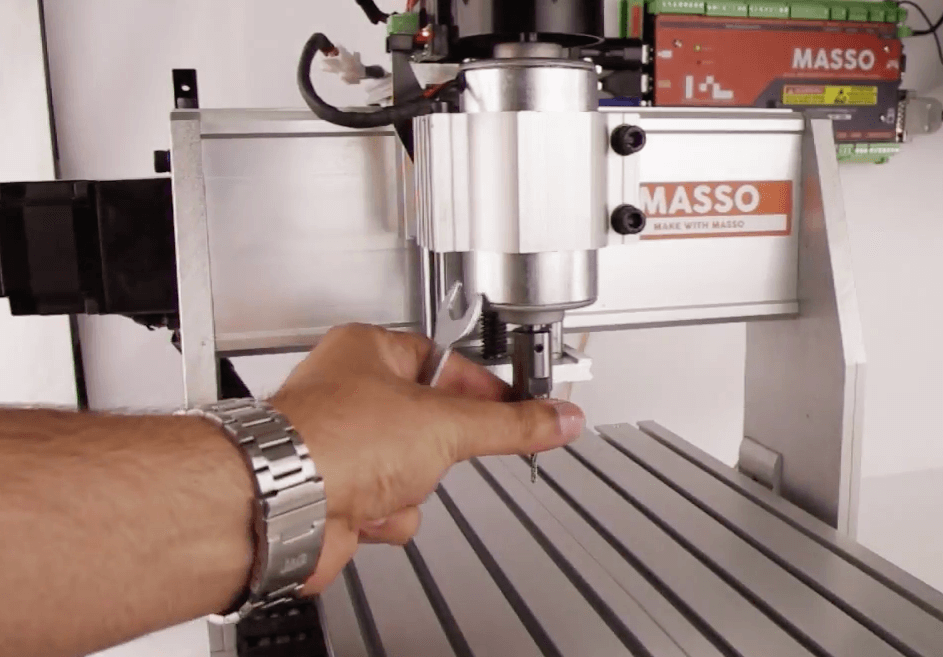
 First you need to load the tool into the tool holder and load it to your machine.
- The next step now is to move the tool to a pre-defined position on the bed, and we will be using the same location to calibrate the height of all the tools.
- Once you are on the position, put a piece of paper under the tool to adjust the height and do a touch off to the bed.
- Move the Z axis down and once we are close enough, we are going to press the page down key to change the step resolution and press the down key until it locks the paper between the tool and the bed. If you have a tool setter you can use it here by moving the tool down till you setter shows 0.00
- Go to the F4-Tools screen and select the tool number from the tools list. Start off with tool number zero, press enter to open the tool window. Give it a name for your own reference. Press the tab key all the way to the zero button, now press enter to zero the tool.
- At this stage MASSO is automatically going to offset the height of the tool and put the values in the Z Offset box. Press tab to go to save button and press enter to finish tool height calibration.
Doing a touch off with an MPG handwheel:
Step 1: Using the MPG pendant first make sure to select the Z axis.
Step 2: Move the Z axis down by turning the hand wheel. As you come closer, change the resolution even further (very minute adjustments) until it’s the paper locks up between the tool and the machine bed.
Step 3: Go back to the F4-Tools screen. Select tool number from the tools list and press enter to edit tool. Go to the zero button and press enter. You will see that MASSO got the Z Offset values automatically. Press tab to go to the save button, press enter again to save the values.
Repeat the same steps for calibrating all your tools, with MASSO you can calibrate up to 32 tools in the tools library.
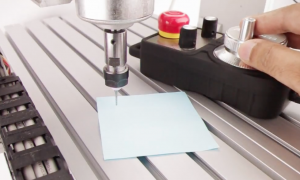
Doing a touch off automatically with a touch plate:
There is another easy way to automatically calibrate the height of the tools and that is using a touch off plate. If you have a touch off plate, you can use it rather than a piece of paper or tool setter to set the height of the tools.
How to do that on the MASSO? Follow these easy points, as shown in this video.
- Position the touch off plate under the tool and wire and setup as per these instructions link.
- On the MASSO we will now need to make up a small probing cycle.
- Go to the F2 screen, press ctrl N to create a new file and give it a name, press enter to save.
- In this file, write the probing cycle G38.2 Z-50 F150, the Z travel is -50 because we are going towards the bed so the value has to be negative and we will put a slow feed rate of about 150 so the tool moves very slowly.
- Next, put an M0 command in the next line. This way when the tool touches the plate, it will automatically stop and the program will come into feed hold.
- Write G0 G53 Z0, this will move the Z axis up to the machine Z0 after we have finished the calibration.
- Finally, put in M30 to rewind the program to start once it’s all finished, press tab to go to the save button and press enter to save. Go to the exit button and press enter to save and exit.
- Run the program by pressing ctrl R. The Z axis will move down towards the touch plate at 150 feedrate and will stop automatically as soon as it touches the plate. Now go to the F4-Tools screen, select the tool, press enter to open the window. Press tab to go to zero button, press enter to zero the tool and finally move to the save button to save and complete the calibration process.
- Go back to the F2 screen. Now if you press ctrl S, the Z axis will move up to machine 0 as per the gcode G53 Z0.
You can repeat the same steps by running the same G-Code file to calibrate other tools. By using this touch plate setup, it becomes easier and even more accurate to touch off your tools.
For more documentation, help, & tips, visit hindtechnology.com.

Post a comment
You must be logged in to post a comment.